Previous
Contents
Next
6. Steps for First Use
A few tips on the
steps to take for first use of the BFF Motion Driver.
1. Install the
software as described in Section 2.
 2.
Using a text editor such as NotePad open one of the default .bff
configuration files included the motion driver directory. Use this
as the basis for your working configuration. There are a number of
configuration parameters that must be set before starting the motion
driver, and there are others (detailed cue parameters) which can be
set either directly in the config file or through the motion driver
GUI. The following parameters should be set before running the
motion driver: 2.
Using a text editor such as NotePad open one of the default .bff
configuration files included the motion driver directory. Use this
as the basis for your working configuration. There are a number of
configuration parameters that must be set before starting the motion
driver, and there are others (detailed cue parameters) which can be
set either directly in the config file or through the motion driver
GUI. The following parameters should be set before running the
motion driver:
-
Hexapod platform
geometry
-
Crank arm radius
(if there is one)
-
Actuator stroke
length and mid position on the 0-255 position feedback scale
(derived from voltage output range of feedback potentiometers)
-
Actuator
Start/Park position
-
Data output mode
(BIN, HEX2 etc - see Section 5), COM port and serial baud rate
-
IP address and
receiving Port if LAN operation is required (must be set for
Condor or X-Plane use)
-
Hot key/button
settings (drive/hold/exit)
There are others (see
Section 4) but these are the main
settings to review before running the motion driver, on some the
default settings might be left as they are, on others you will need
your own settings.
Additionally there are
six sets of detailed parameters which define scaling, mixing and
filtering of the individual DOF cues, and a set of parameters which
define how much of the maximum possible motion range is used by each
cue. These could be set directly in the .bff file however it is
probably best to set these using the P, R, H, Y and M settings
buttons on the main driver window. This should be done with the
platform INACTIVE to start with because they will directly affect
the motion output. The GUI settings windows provide more detailed
pop-up tips for each parameter. In V3.3 & later new slider-based
settings windows provide a more intuitive cue settings facility.
3. Run the motion
driver software - see Section 3. This
should be done with an FS9/X flight already active (in windowed
mode) with the aircraft sitting stationary on the ground and the sim
un-paused. Your platform servo drive hardware should NOT be
active/connected until you are happy with the cue output from the
driver.
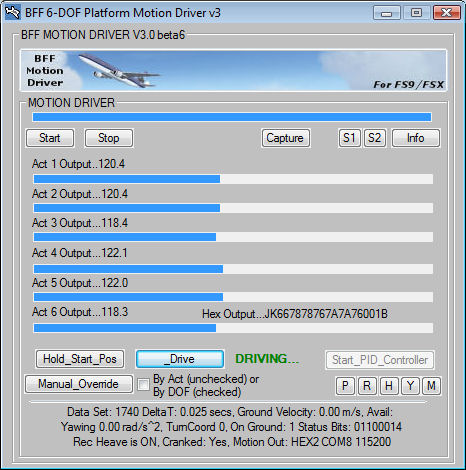
Make yourself familiar
with the driver GUI data and buttons. The cue outputs (by actuator)
are shown on the progress bars (actuator low is left, high is right
if the feedback is +ve with upwards heave). The Drive and Hold
buttons provide the main start/stop controls, and the driver will
start with the cue output at the start/park position defined in the
.bff config file. Motion between the hold and drive positions should
be smooth and slow.

In V3.30+ of the
motion software new "Easy" cue settings windows are available. These
use sliders to set the important cue settings to allow more
intuitive adjustment of the motion cues.
When the Adv. (advanced) checkbox is clear (default) the
P, R, H & Y buttons will open "Easy" cue settings windows which
provide sliders to adjust the key settings for each cue.
See
Section 6B for more details of the
Easy slider-based cue settings windows.
When the Adv. checkbox is ticked the cue settings windows
show the numerical cue parameters to allow more advanced adjustment
and tuning.
Cue setup using the
Advanced settings windows involves defining aircraft acceleration levels to
use for the force cues and aircraft pitch and roll angles to fit to
the motion. If you do not know what acceleration levels to use then
use the Capture window during a flight to establish typical
acceleration and angles for flight with your chosen aircraft.
Open the M
(mix) window and review and set the movement range utilisation for
each DOF. Maximum range for each degree of freedom can only be
achieved if there is no simultaneous movement in other degrees of
freedom. Where there is an expectation that large movements in
certain DOF's will coincide then it might be appropriate to limit
the maximum range utilisation of those DOF's. For example if you
wish to retain some heave capacity whilst the platform is at a large
bank angle then you may wish to restrict the roll DOF to utilising
60% (say) of its maximum possible range. This would leave some
actuator stroke for heave movement.
Note that saving the
settings will save to the .bff config file you have opened. If you
wish to use mulitple config files (for different aircraft or flight
types) then make copies of the .bff file in the motion driver
directory and select your required file on driver startup. You can
then update the settings for that configuration as you require.
4. Inspect the cue
response (visually on the progress bars and using the built-in scope
features) during the flight conditions for which you expect to run
the motion platform. Although you may not be able to assess the fine
tuning of the cues you will be able to check that the cue output is
smooth and comfortably within the actuator working ranges.
Once you are satisfied
that the cues are well behaved then you can proceed to testing the
driver with your active servo drive.
Previous
Contents
Next
|