Previous
Contents
Next
2. Vibration Configuration Settings
WARNING
Very heavy output vibrations
can be produced by unreasonably aggressive vibration settings.
Always check new settings by running the BFF Shaker software with
your hardware disconnected or powered-down.
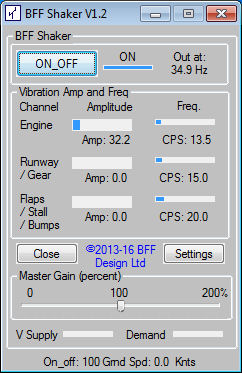
The magnitude of the new vibration outputs can then be observed and
confirmed using the Vibration Amp and Freq progress bars
before going live with the motor drive.
The composition of the vibration
output is defined using configuration settings which are loaded from
file on program start-up.
The vibration settings are stored
in .cfg configuration files in the Shaker software working folder.
Typically the configuration files hold settings appropriate for
specific aircraft or types of aircraft.
A limited number of settings must
be made manually when the system is first configured on your PC by
opening the .cfg file in use with NotePad or another text editor.
The remaining settings which
define the composition of the vibration effects are set through the
BFF_Shaker software window - click the Settings button to
display the settings area of the GUI.
A number of configuration files
are provided in the software zip archive and can be used as a start
point for your own set up. Chose the configuration file of the
aircraft type closest to your own as your start point.
Manually Set Parameters
The manually set parameters are in
the [Setup] area of the configuration file.
========================
[Setup]
COMPort=COM5
COM Port number for the
SHKR-1 card data cable (in range COM1 to COM9. Ignored for
BSH-DRV-2 cards)
Baud=516129
Baud rate for the serial comms
- must be as shown
(ignored for BSH-DRV-2 cards)
Delay=25
Pause delay per processing loop - minimises
CPU usage and allows matching to FS FPS
CPS_max=150
Max component frequency - demands above this
will be capped at this level
DRVR1_Err_Enable=1
Enable Pololu driver 1 error pin monitoring
DRVR2_Err_Enable=0
Enable Pololu driver 2 error pin monitoring
Joy_But=1
Number of joystick on system to
use for hot ON/OFF buttons (use button LS for assistance)
=0 to disable hot buttons
But_Drive=10
Joystick button number assigned to ON
But_Hold=11
Joystick button number assigned to
OFF
Pause_Enable=1
=1 to switch output OFF when flight sim
is paused, otherwise output will remain ON
Force_COMPort=0
V1.5+ set =1 to disable the attempts
by the software to connect to the card via FTDI's
D2XX direct driver. Instead only the specified COM port will be
used. Can be used for
older BSH-DRV-1 and SHKR-1 card configs. =0 for BSH-DRV-2 cards.
ON_at_Startup=0
V1.5+ set =1 to activate
vibration output directly when the software is started
========================
On first set up the COM port for
your serial data cable will need to be defined (for BSH-DRV-1 and
SHKR-1 cards only). For BSH-DRV-2 cards the software connects
directly to the card via USB and no COM port setting is required.
Setting Force_COMPort=1 when using
BSH-DRV-1 or SHKR-1 cards will bypass the attempts the software
would otherwise make to find and connect to any BSH-DRV-2 cards on
the system. This can help connection if you are running both older
and new cards at the same time.
If using the SHKR-1
card you may also wish to
enable error reporting on the output(s) to which your Pololu driver
card(s) are attached. DO NOT enable error reporting on un-used
outputs as this will produce false error messages.
The Delay parameter is in ms and
can be used to adjust the loop time of the software to better match
the simulator frame rate whilst minimising the CPU usage of the
software.
CPS_Max should be left at the
default value. This will instruct the system to limit the frequency
of any vibration component to keep it within the capability of the
SHKR-1 card. If this setting is altered it can result in high
frequency components causing a constant drive output at the motor.
Joy_But can be used to enable hot
buttons for remote control of ON & OFF. Set it to the number of the
joystick, or set to 0 (zero) to disable hot buttons.
The behaviour of the output when
the flight sim is paused can be set using parameter Pause_Enable.
When Pause_Enable=0 the vibration output will continue when the
flight sim is paused. This is useful when tuning the settings - the
flight can be paused at a specific condition and the vibration
settings adsjusted as required. When Pause_Enable=1 the vibration
output will switch OFF when the flight sim is paused, and will
resume when it is unpaused.
ON_at_Startup can be used to set
the software to make the vibration output active as soon as it
starts. This can help start-up procedures in some Sims.
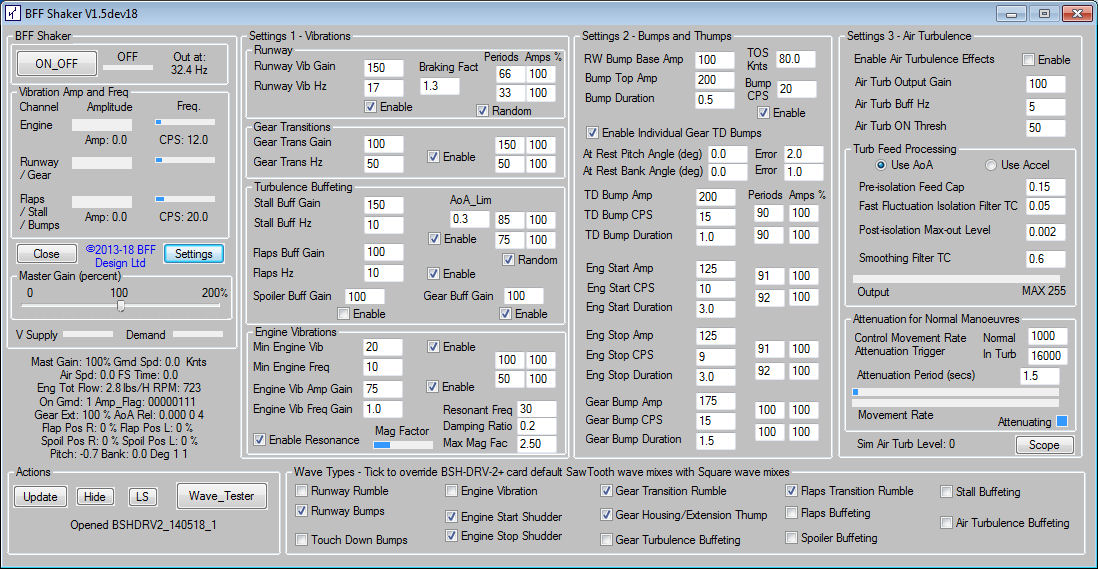
Parameters set in the Software
Window
Click the Settings button
to toggle the main settings area display.
The settings are shown in two
areas:
Settings 1 - Vibrations
define the "steady" vibration effects such as continuous engine and
longer duration flaps, runway vibration etc effects.
Settings 2 - Bumps and Thumps
define short duration effects such as touch-down bumps, engine start
& stop shudders etc.
Settings 3 - Air Turbulence
see - Appendix 2 for more
information.
Changes made to the settings are
not saved and made active until the Update button is clicked.
IMPORTANT - Detailed
descriptions of each setting are available as pop-up tool tips -
move and hold the cursor over the setting input field and the tool
tip for that setting will appear. This is the best way to find
information on a setting.
General Description
The vibration output for each
effect is in the form of a mix of three waves. The amplitude
of the waves is defined using the various amplitude gain settings.
The frequency of the first (or main) wave of the mix is defined by
the frequency gain setting for that effect. The relative frequencies
of the remaining two waves for the mix are set by the Period %
settings for the effect. These set the relative period as a
percentage of that of the main wave in the mix - so period settings
less than 100% produce sub-waves with a higher frequency than the
main wave. Note that a cap of 150Hz applies to all waves, so period
settings that produce sub waves with higher than 150Hz will be
limited in effect.
The effect of this mixing approach
to the vibration generation is a richer vibration effect as
interference between the waves in the mix affect the overall
vibration output. Adjusting the Period % settings can significantly
change the feel of the vibrations.
The amplitude and frequency of the
various effects will also vary with the flight conditions to reflect
the current state of the aircraft operation.
Individual vibration effects can
be disabled using the check-boxes provided. To disable a bump effect
that does not have an enable check-box simply set the amplitude gain
for the effect to zero.
There is considerable scope for
experimentation - and for getting lost! So keep copies of your
configuration files so you can go back to them. There will also be
some experimentation required to adjust the relative strengths of
the various effects to suit your own preferences and cockpit.
Working with one effect at a time by temporarily disabling the
others may be more effective than trying to adjust effects all at
once.
WARNING
Very heavy output vibrations
can be produced by unreasonably aggressive vibration settings.
Always check new settings by running the BFF Shaker software with
your hardware disconnected or powered-down.
The magnitude of the new vibration outputs can then be observed and
confirmed using the Vibration Amp and Freq progress bars
before going live with the motor drive.
Previous
Contents
Next
|